Drawing a triangle
With some exceptions (like the clear operation that was used before), OpenGL doesn't provide any function to directly draw shapes. There is no draw_rectangle, draw_cube or draw_text function for example. Instead everything is handled the same way: through the graphics pipeline. It doesn't matter whether you draw a simple triangle or a 3D model with thousands of polygons and advanced lighting techniques, everything uses the same mechanics.
This is the point where the learning curve becomes very steep, as you need to learn how the graphics pipeline works even if you just want to draw a single triangle. However once you have passed that step, it will become easier to understand the rest.
Before we can draw a triangle, we need to prepare two things during the initialization:
- A shape that describes our triangle.
- A program that will be executed by the GPU.
Shape
A shape represents the geometry of an object. When you think "geometry", you may think of squares, circles, etc., but in graphics programming the only shapes that we are going to manipulate are triangles (note: tessellation unlocks the possibility to use other polygons, but this is an advanced topic).
Here is an example of an object's shape. As you can see, it is made of hundreds of triangles and only triangles.
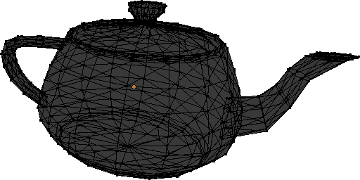
Each triangle is made of three vertices, which means that a shape is just a collection of vertices linked together to form triangles. The first step to describe a shape like this with glium is to create a struct named Vertex (the actual name doesn't matter) whose purpose is to describe each individual vertex. Our collection of vertices can later be represented by a Vec<Vertex>.
# #![allow(unused_variables)]
#fn main() {
#[derive(Copy, Clone)]
struct Vertex {
    position: [f32; 2],
}
implement_vertex!(Vertex, position);
#}
To make the implement_vertex! macro available you need to add the following lines above the main function:
# #![allow(unused_variables)]
#fn main() {
#[macro_use]
extern crate glium;
#}
Our struct contains a position field which we will use to store the position of each vertex on the window. Being vector-based, OpenGL doesn't use coordinates in pixels. Instead it considers that the window has a width and a height of 2 units, and that the origin is at the center of the window.

When we give a position to OpenGL, we need to use this coordinate system. Let's pick a shape for our triangle, for example this one:

Which translates into this code:
# #![allow(unused_variables)]
#fn main() {
let vertex1 = Vertex { position: [-0.5, -0.5] };
let vertex2 = Vertex { position: [ 0.0,  0.5] };
let vertex3 = Vertex { position: [ 0.5, -0.25] };
let shape = vec![vertex1, vertex2, vertex3];
#}
We now have our shape! There is one last step which consists of uploading this shape to the memory of our GPU in what is called a vertex buffer, for faster access. Even though that is not strictly necessary, it is very easy to do so and it will make our drawing operation considerably faster.
# #![allow(unused_variables)]
#fn main() {
let vertex_buffer = glium::VertexBuffer::new(&display, &shape).unwrap();
#}
More complex shapes consist of hundreds or thousands of vertices. We not only need to have a list of vertices, but also a way to tell OpenGL how to link these vertices together to obtain triangles. Since we only have one triangle, this isn't really a problem for us, so we just create a dummy marker that we will pass to glium later on.
# #![allow(unused_variables)]
#fn main() {
let indices = glium::index::NoIndices(glium::index::PrimitiveType::TrianglesList);
#}
This tells OpenGL that we don't use indices and instead want to draw a certain number of separate triangles.
Program
When OpenGL was first created in the 1990s, drawing an object simply consisted of sending a shape alongside various parameters like the color, lighting direction, fog distance, etc. But these parameters quickly became too limiting, and when OpenGL 2 was released, a more flexible system was added with what so called shaders. When OpenGL 3 was released a few years later, all of these parameters were removed and completely replaced by shaders.
In order to draw a triangle, you will need some basic understanding about how the drawing process (also called the pipeline) works.

The list of coordinates at the left of the schema represents the vertices of the shape that we have created earlier. When we ask the GPU to draw this shape, it will first execute what is called a vertex shader, once for each vertex (this means three times in this case). A vertex shader is a small program whose purpose is to tell the GPU what the screen coordinates of each vertex are going to be. Then the GPU builds our triangle and determines which pixels of the screen are inside of it. It will then execute a fragment shader once for each of these pixels. A fragment shader is a small program whose purpose is to tell the GPU what color each pixel should be.
The tricky part is that we need to write the vertex and fragment shaders. To do so, we have to write it using a programming language named GLSL, which is very similar to the C programming language. Teaching you GLSL would be a bit too complicated for now, so I will just give you the source codes. Here is the source code that we will use for the vertex shader:
# #![allow(unused_variables)]
#fn main() {
let vertex_shader_src = r#"
    #version 140

    in vec2 position;

    void main() {
        gl_Position = vec4(position, 0.0, 1.0);
    }
"#;
#}
First of all, the #version 140 line is here to tell OpenGL what version of GLSL this shader is written in. Some hardware doesn't support the latest versions of GLSL, so we are trying to stick to earlier versions if possible.
When we defined the Vertex struct in our shape, we created a field named position which contains the position of our vertex. But contrary to what I let you think, this struct doesn't contain the actual position of the vertex but only an attribute whose value is passed along to the vertex shader. OpenGL doesn't care about the name of the attribute, all it does is give the value to the vertex shader. The in vec2 position; line of our shader is here to declare that we are expected to be given an attribute named position of type vec2 (which corresponds to [f32; 2] in Rust).
The main function of our shader is called once per vertex, which means three times for our triangle. The first time, the value of position will be [-0.5, -0.5], the second time it will be [0.0, 0.5], and the third time [0.5, -0.25]. It is in this function that we actually tell OpenGL what the position of our vertex is, thanks to the gl_Position = vec4(position, 0.0, 1.0); line. We need to do a small conversion because OpenGL doesn't expect two-dimensional coordinates, but four-dimensional coordinates (the reason for this will be covered in a later tutorial).
The second shader is called the fragment shader (sometimes also named pixel shader).
# #![allow(unused_variables)]
#fn main() {
let fragment_shader_src = r#"
    #version 140

    out vec4 color;

    void main() {
        color = vec4(1.0, 0.0, 0.0, 1.0);
    }
"#;
#}
This source code is very similar to our vertex shader above. This time the main function is executed once per pixel and has to set the color of this pixel, which we do with the color = vec4(1.0, 0.0, 0.0, 1.0); line. Just as with clear_color earlier, we need to pass along the red, green, blue and alpha components of the pixel. Here we are specifying an opaque red color. It is possible to set different values per-pixel, but this will be covered later.
Now that we have written our shaders' source codes, let's send them to glium:
# #![allow(unused_variables)]
#fn main() {
let program = glium::Program::from_source(&display, vertex_shader_src, fragment_shader_src, None).unwrap();
#}
Drawing
Now that we have prepared our shape and program, we can finally draw a triangle!
Remember the target object? We will need to use it to start a draw operation.
# #![allow(unused_variables)]
#fn main() {
let mut target = display.draw();
target.clear_color(0.0, 0.0, 1.0, 1.0);
// draw the triangle here
target.finish().unwrap();
#}
Starting a draw operation needs several things: a source of vertices (here we use our vertex_buffer), a source of indices (we use our indices variable), a program, the program's uniforms, and some draw parameters. We will explain what uniforms and draw parameters are in the next tutorials, but for the moment we will just ignore them by passing an EmptyUniforms marker and by using the default draw parameters.
# #![allow(unused_variables)]
#fn main() {
target.draw(&vertex_buffer, &indices, &program, &glium::uniforms::EmptyUniforms,
            &Default::default()).unwrap();
#}
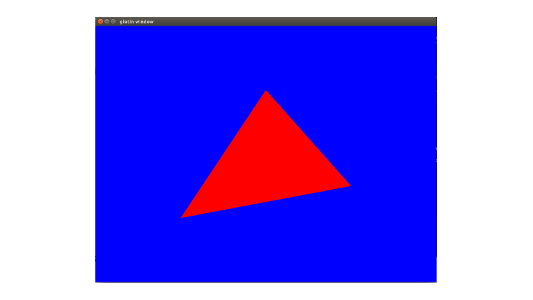
The "draw command" designation could make you think that drawing is a heavy operation that takes a lot of time. In reality drawing a triangle takes less than a few microseconds, and if everything goes well you should see a nice little triangle: